
An above-ground pool is a party starter, not a DIY headache. You want a deck that looks great, feels sturdy, and makes you actually want to spend more time outside. Let’s break down a step-by-step plan that keeps things simple, safe, and surprisingly stylish.
Plan it out before you lift a single board
You don’t want to wing this and end up with a wonky deck that tilts when you sneeze. Start with a real plan:
- Measure the pool footprint and determine deck size. Do you want a full wrap-around or a simple square beside the ladder?
- Check local codes for permits, setbacks, and guardrails. Yes, your HOA will notice if you skip this.
- Choose a deck style that fits your yard and budget. Composite, pressure-treated, or PVC—each has its quirks.
- Decide on the height. Do you want a level entry next to the pool or a raised deck with stairs?
Materials and tools crash course
FYI picking the right stuff makes the project smoother and the payoff higher.
- Base materials: concrete piers or treated lumber posts, plus a frame that will hold up rain, sun, and your dance-party Sundays.
- Decking: composite for low maintenance, pressure-treated for budget, or PVC for longevity.
- Railings and steps: code-compliant rails, gates if you’ve got kids or pets, and non-slip treads.
- Fasteners: stainless or coated galvanized screws; avoid nails that back out after a season.
- Drainage: ensure a slight slope away from the pool and deck to prevent puddles.
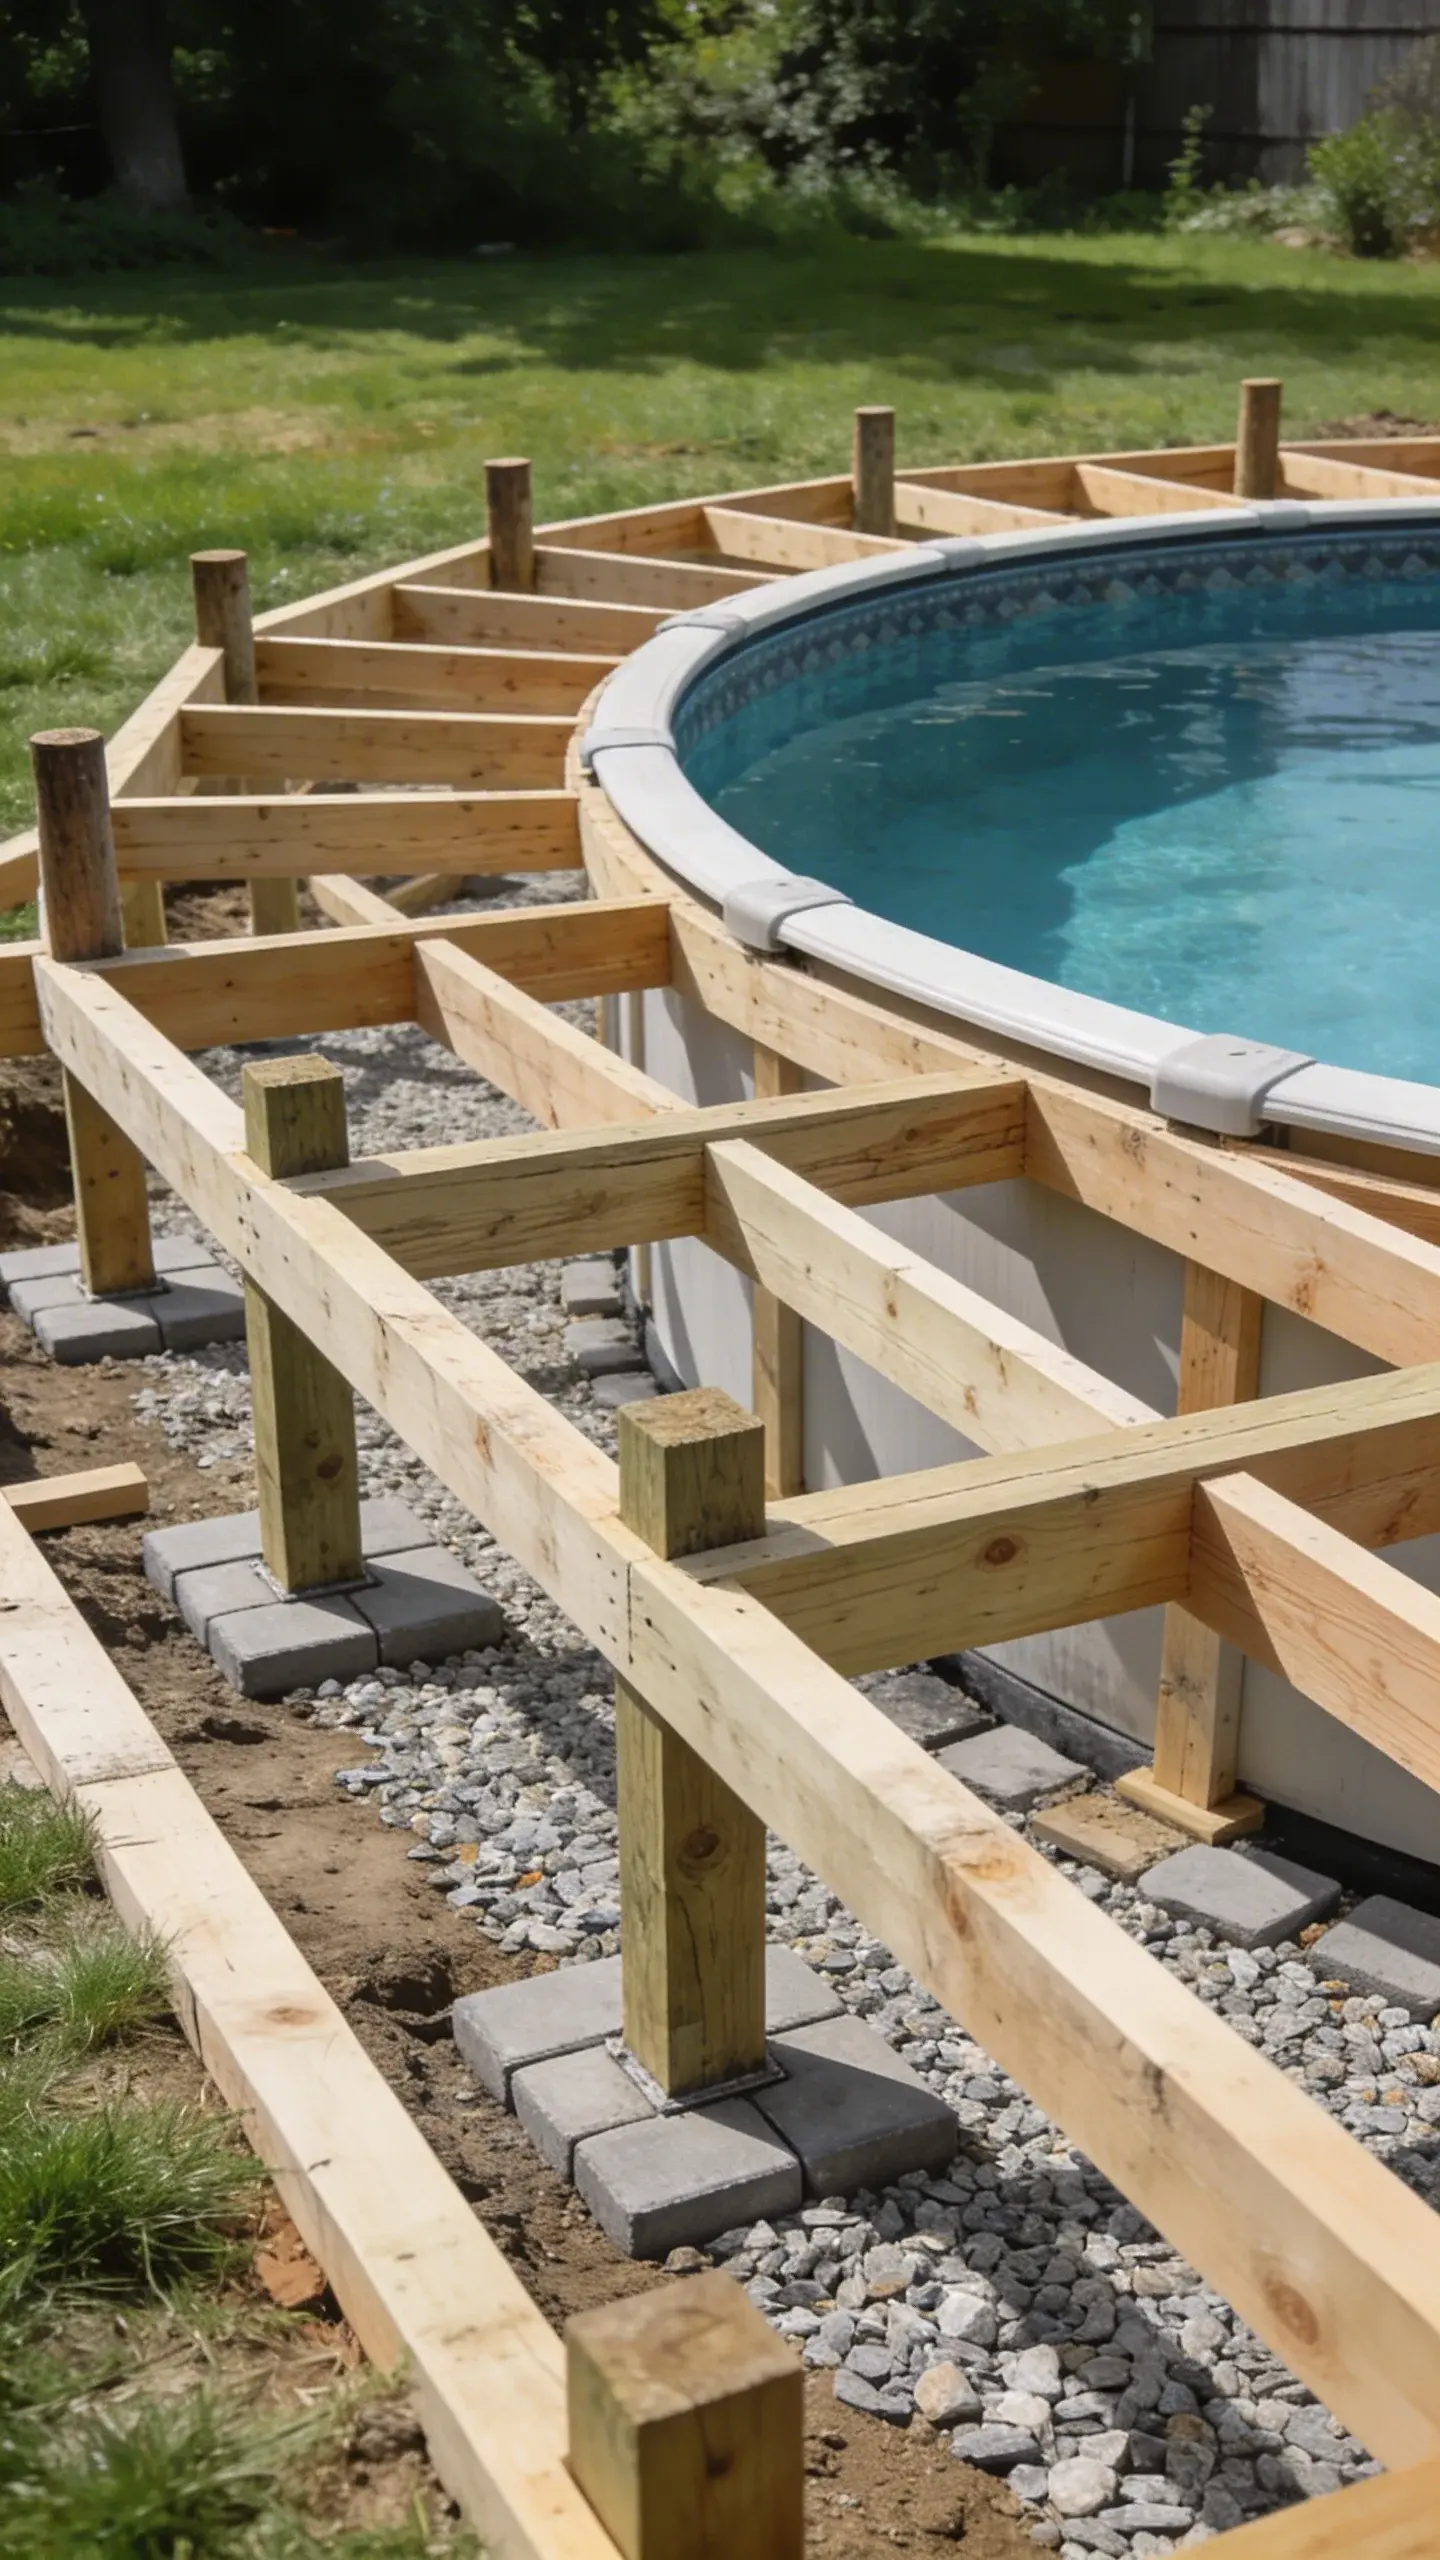
Foundation and framing: the boring-but-book-worthy stuff
A sturdy foundation saves you from future headaches.
- Mark the deck line and dig for footings. You want solid, not swampy vibes underfoot.
- Install footings or concrete piers. Keep them level using a string line or laser. Yes, precision matters here.
- Build a square, then plumb and level. If your corners aren’t at right angles, the rest of the deck will look sad.
- Frame with treated lumber or your chosen framing material. Double up on joists where you expect heavy foot traffic.
Tip: layout tricks that save headaches
– Dry-fit the whole thing before screwing anything down. It’s like trying a new outfit in the store—better to know if it fits before you commit.
– Use spacers to keep your decking uniform. Great-looking gaps beat chunky misalignment every time.
Decking install: from plan to planks
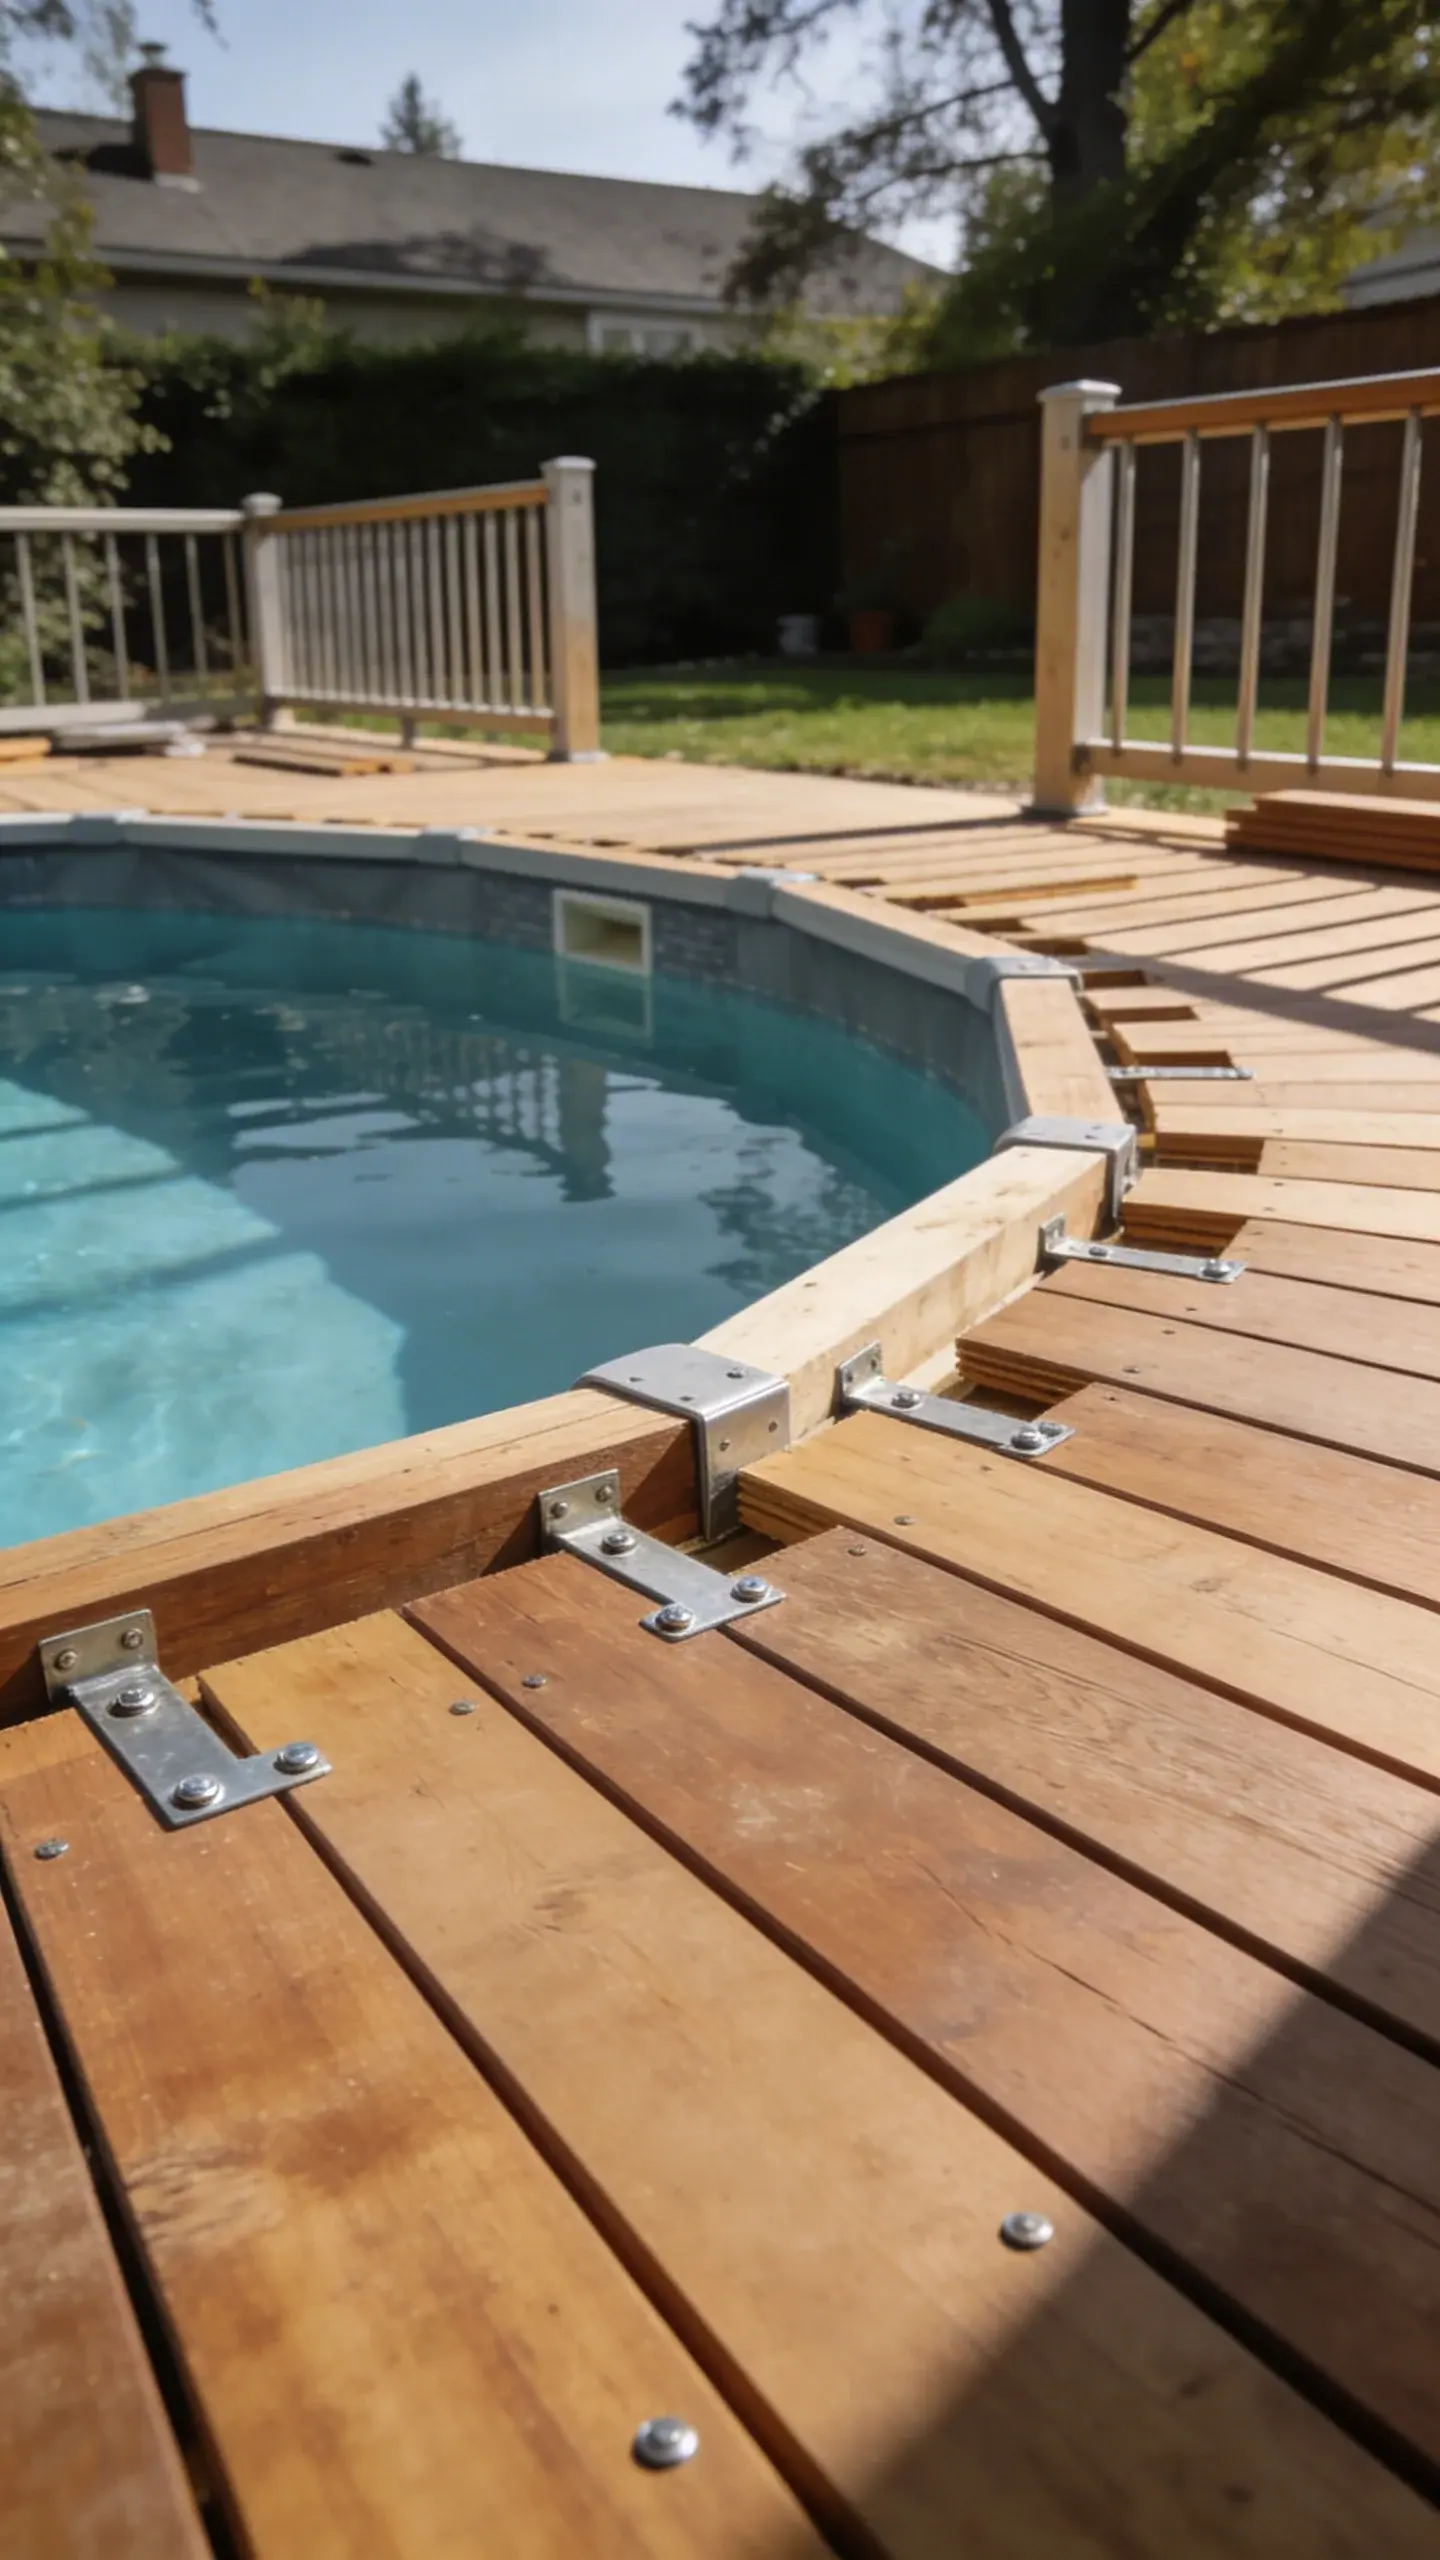
Now we get to the good stuff—the visible part that makes the backyard pop.
- Lay out the first row of decking boards, then secure them with hidden or face-fastening methods depending on your vibe.
- Leave proper gaps for drainage and expansion. No one wants a board that looks swollen after a rainstorm.
- Continue row by row, checking for level as you go. If you start to wobble, reset early and save yourself drywall-like repair later.
- Trim edges for a clean finish. A good chop saw and a steady hand are your friends here.
Subsection: choosing between floating vs. attached decks
– Floating decks sit on a foundation of sleepers, offering a bit more give and easier insulation from ground moisture.
– Attached decks share a wall with the pool structure, giving a seamless transition. That’s sleek, but you’ll need to manage movement and flashing against water intrusion.
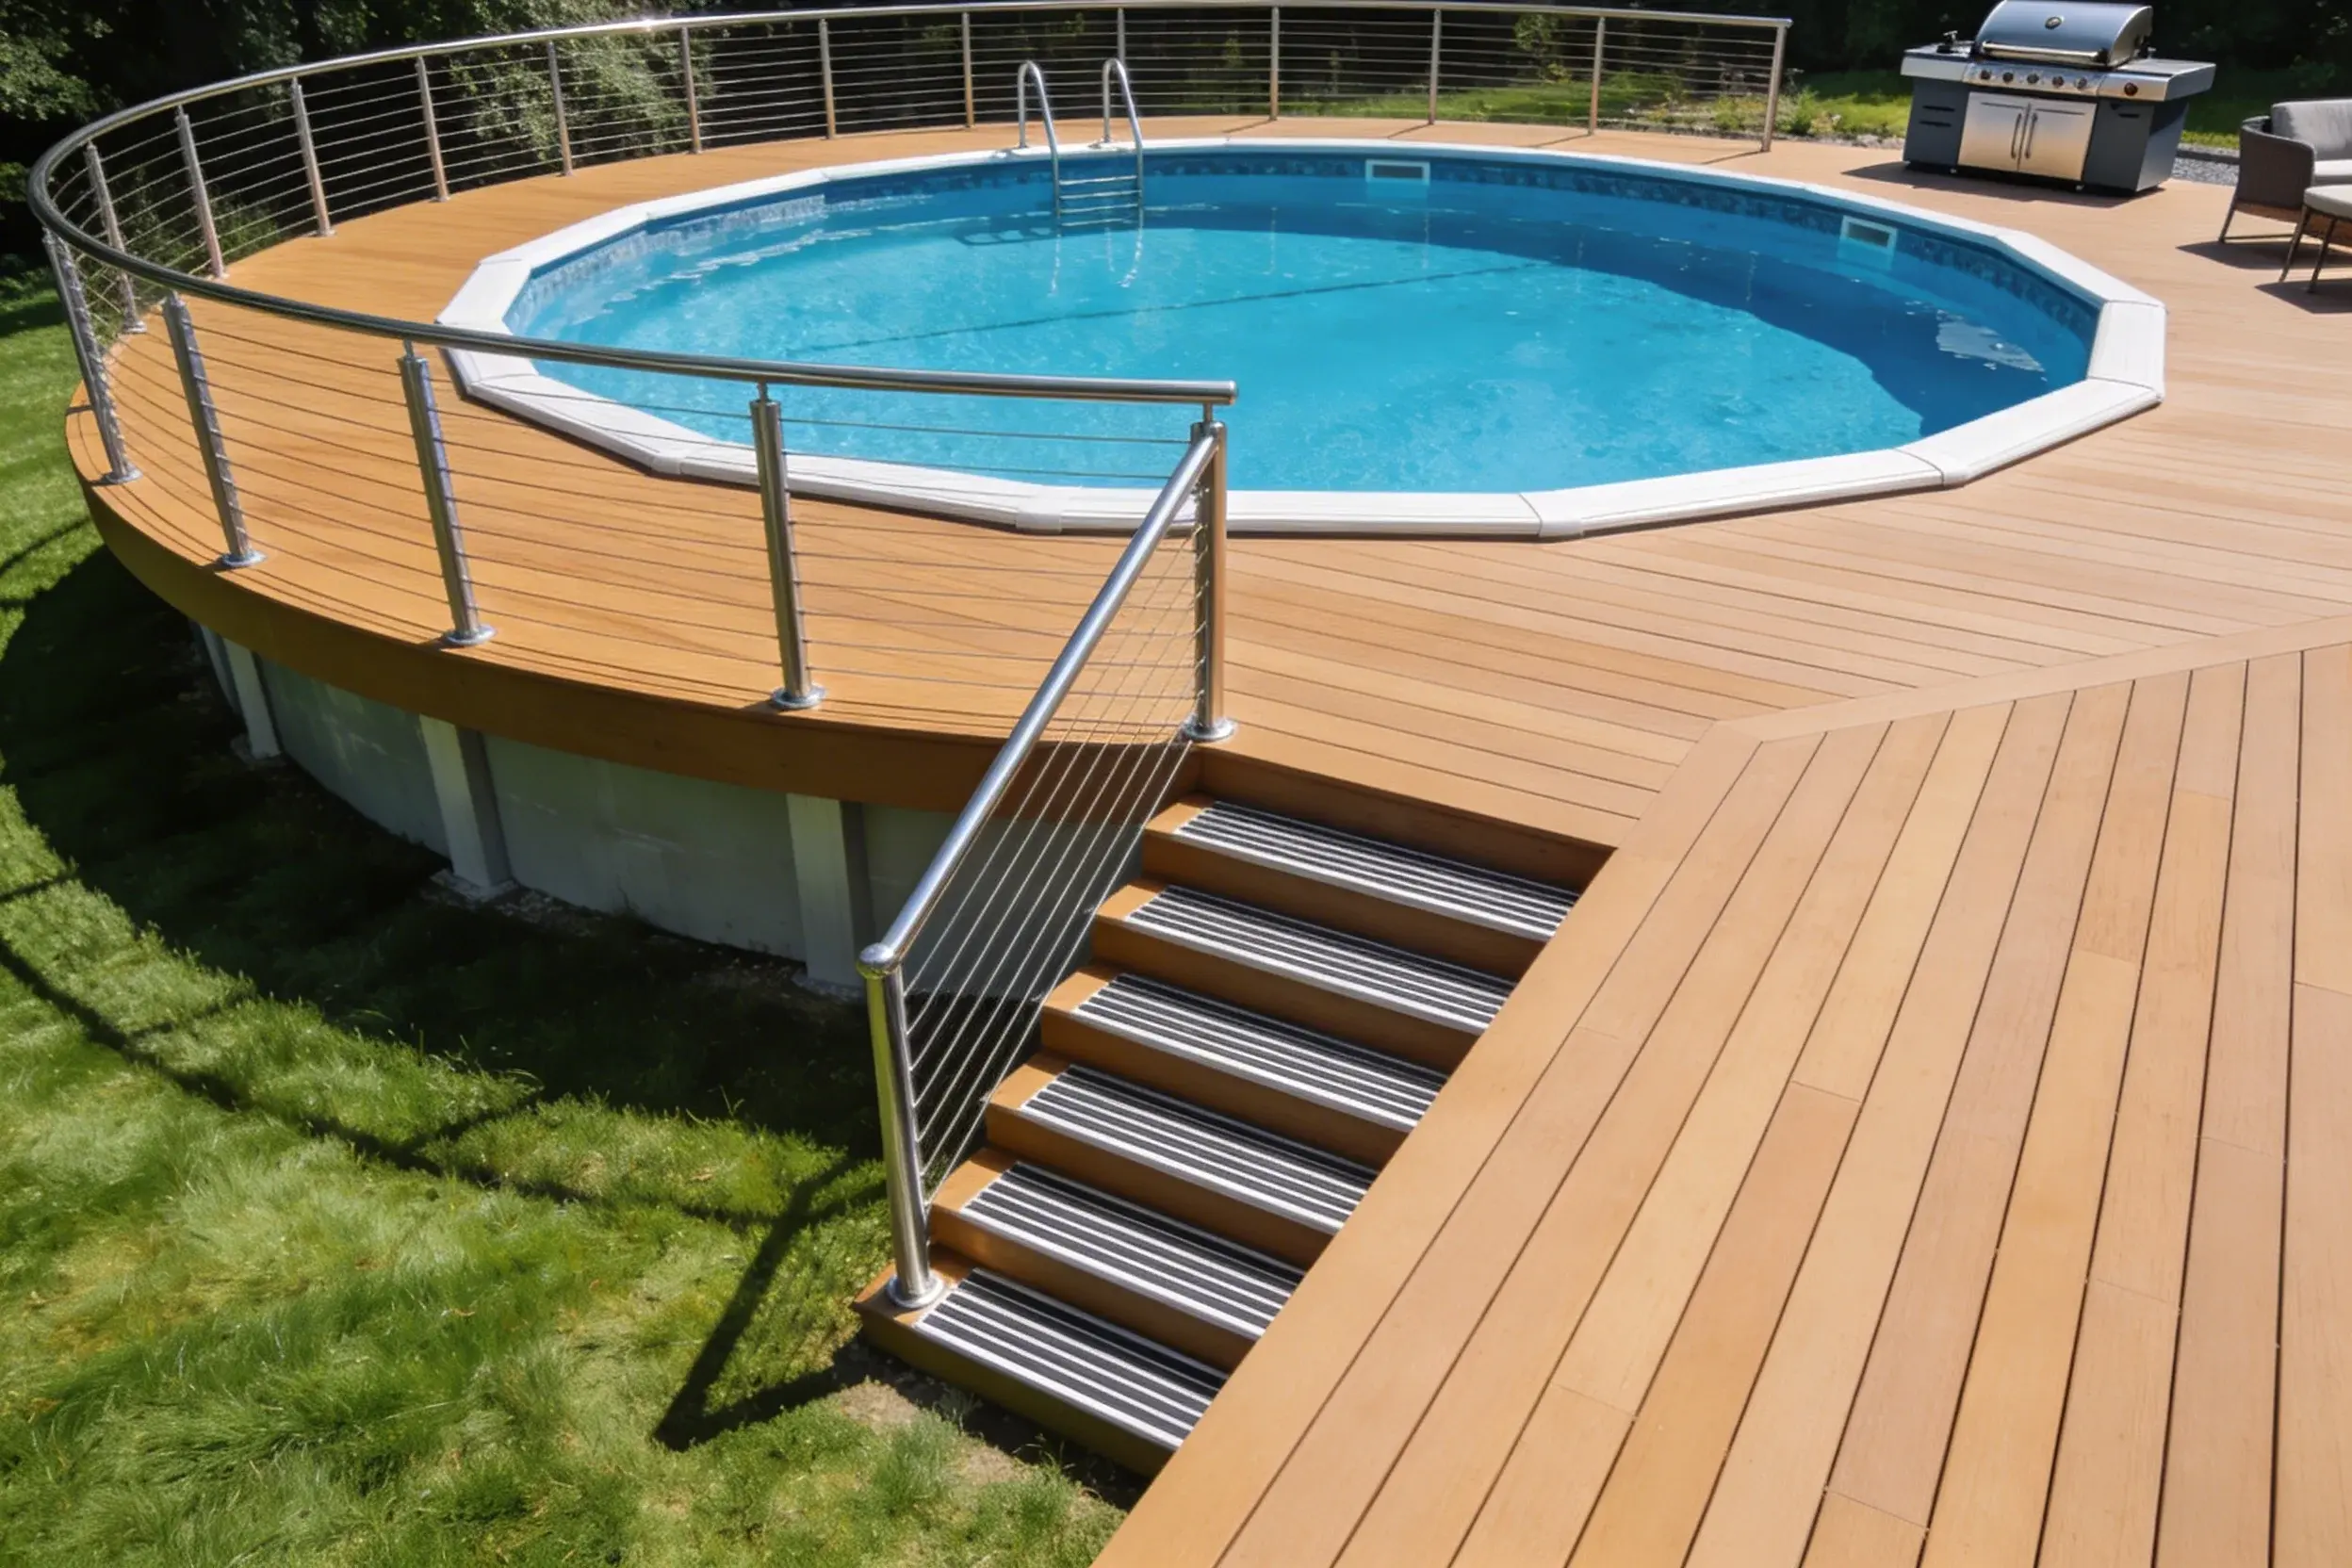
Railing, steps, and safety: don’t skip this part
Safety first, style second. Or maybe safety and style tie for first place.
- Guardrails: check local code for height and spacing. You want kids and pets to stay safe without feeling boxed in.
- Stairs: plan wide, shallow steps with anti-slip treads. Nobody wants to perform a dramatic slip-and-slide entrance at the pool edge.
- Gates: if your deck opens toward the pool, a self-closing, self-latching gate is worth the investment.
- Finish with non-slip coatings or textured boards to keep everyone from doing interpretive slides in flip-flops.
Subsection: lighting and ambiance
– Low-voltage LED ribbons along the stairs and rail caps create a warm glow without blinding you at dusk.
– Path lights along the perimeter help with safety and curb appeal—IMO, it’s the easiest upgrade with big impact.
Finishing touches: color, storage, and vibes
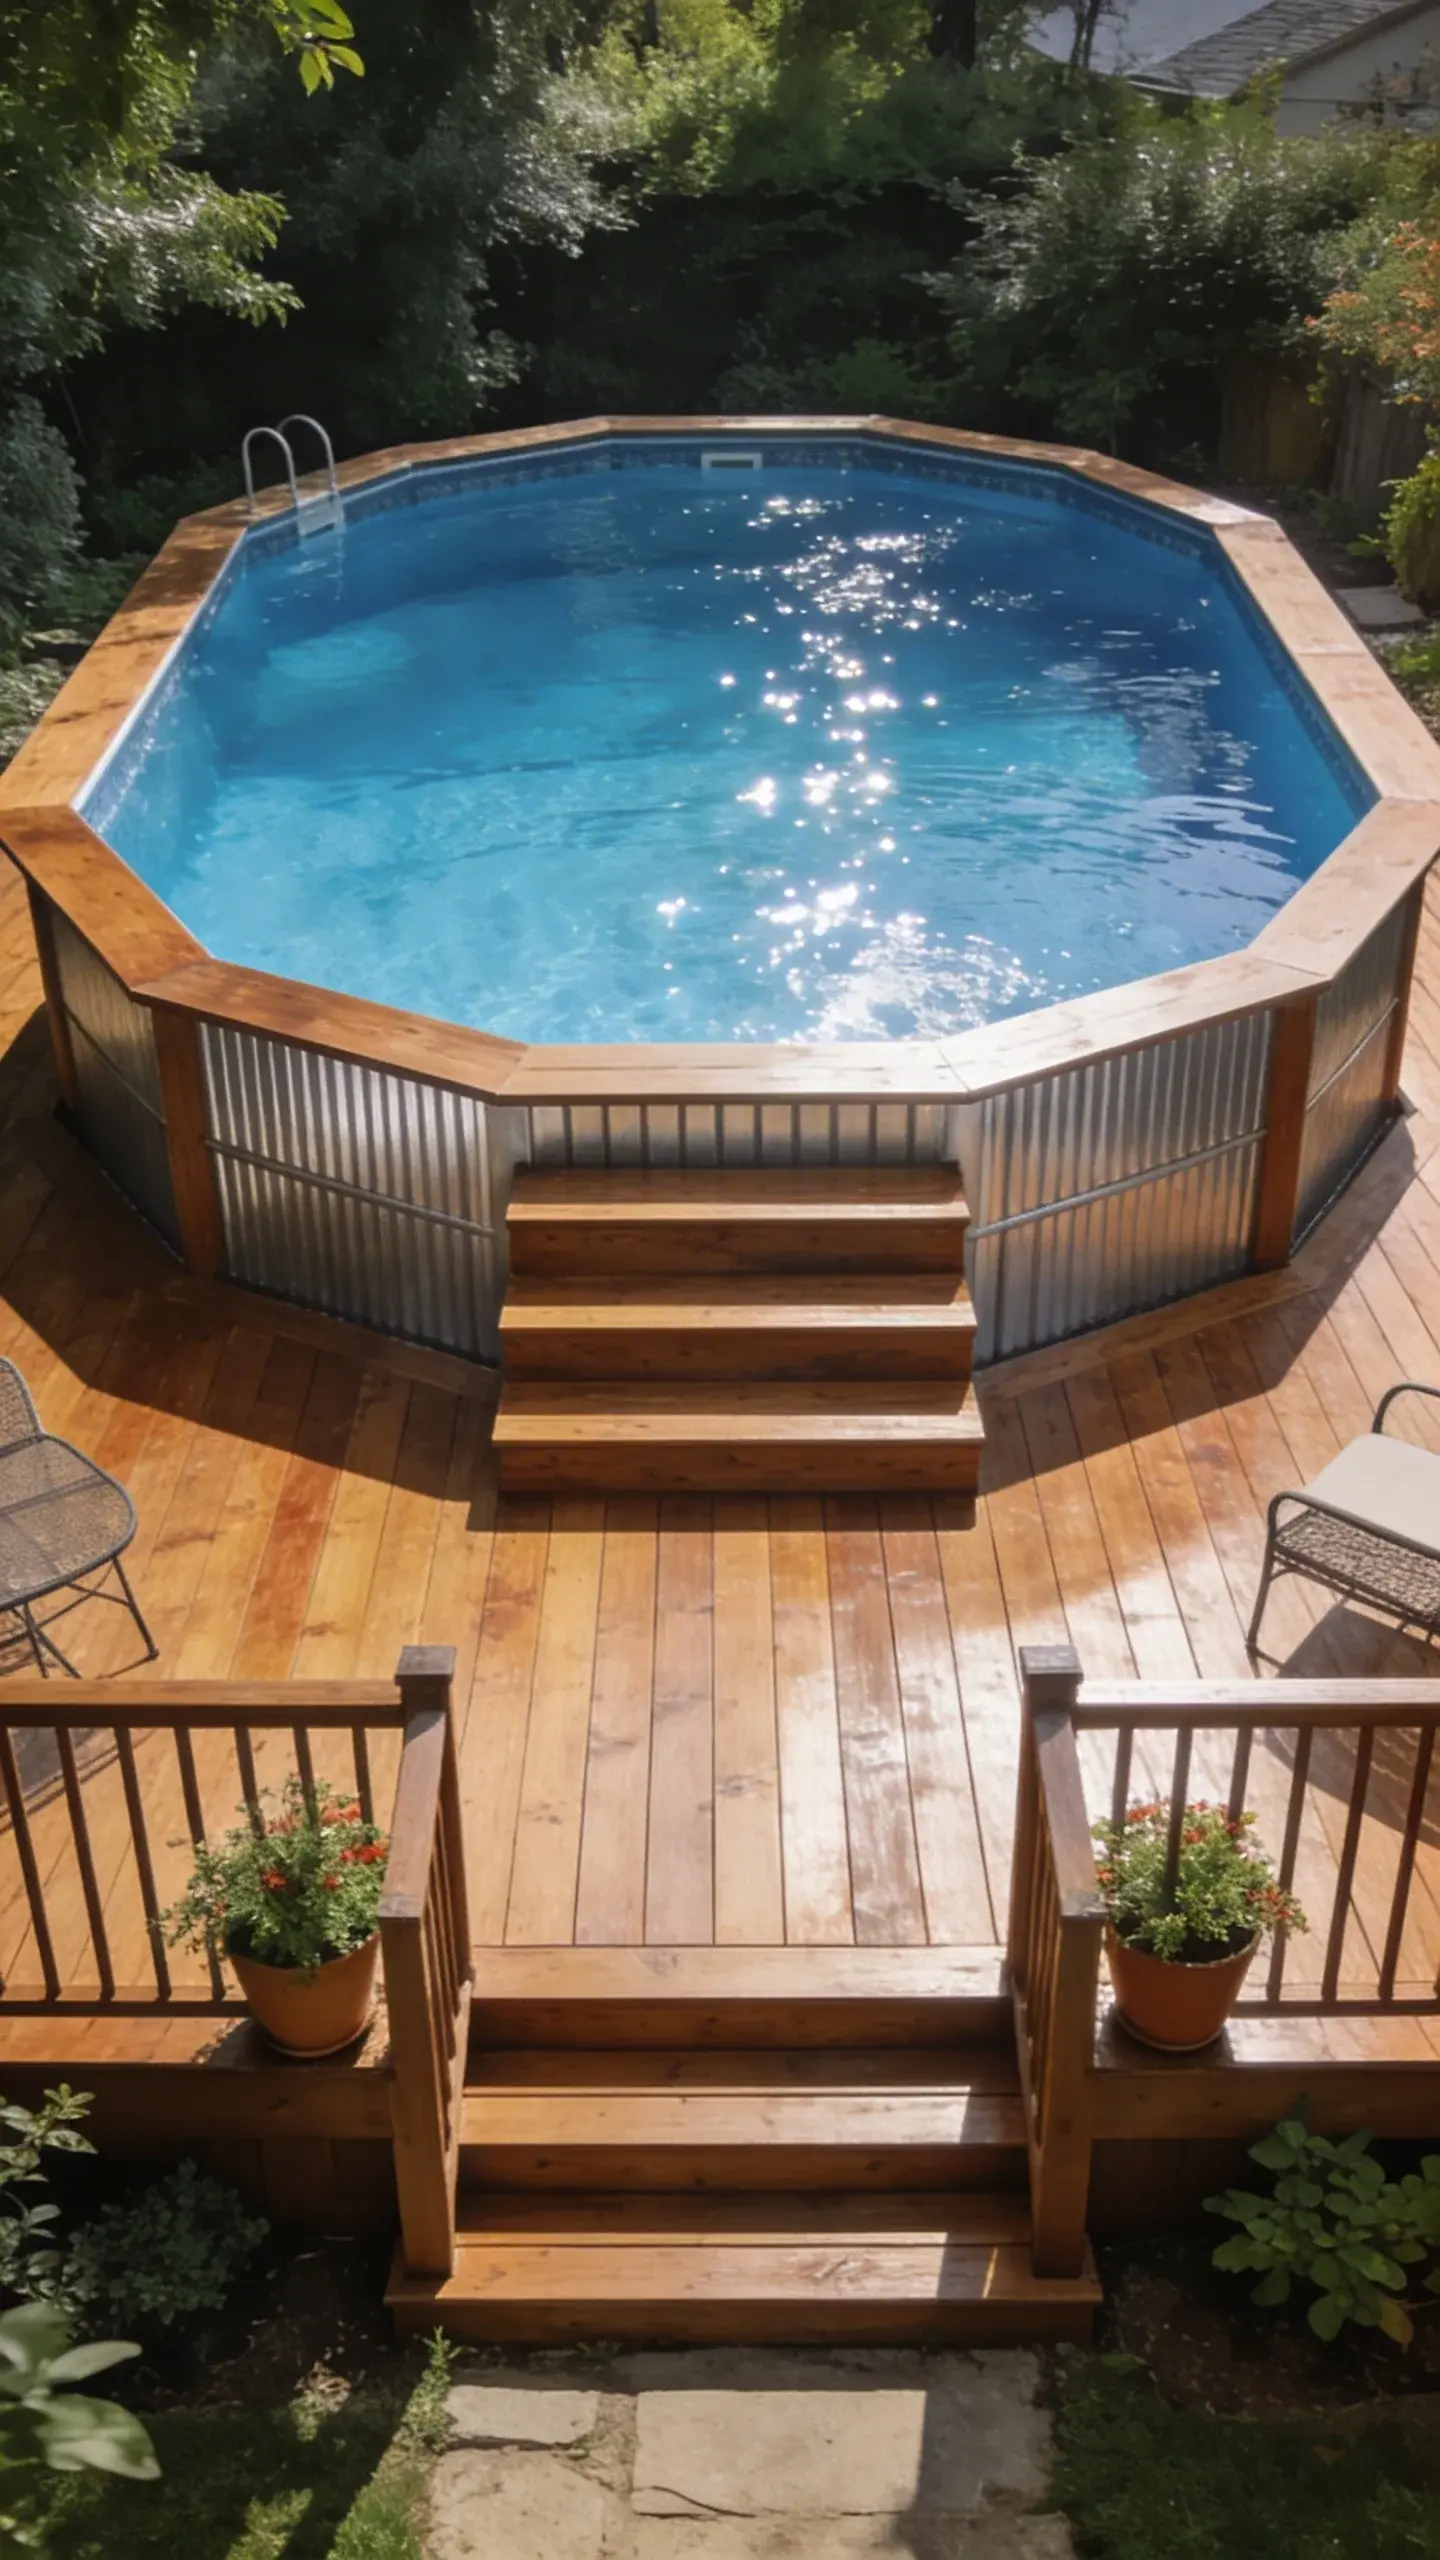
This is where your deck starts showing personality.
- Color: match or contrast with your pool, house, or landscape. Light grays and whites feel fresh; deep browns and charcoals look modern.
- Storage: add a bench with hidden storage for pool toys and towels. It’s like a tiny house for your deck.
- Landscaping: plan planters or shrubbery that won’t block airflow or pool access. A few strategic plants make the space feel intentional.
- Seating nooks: build in a corner with a couple of sturdy chairs. You’ll thank yourself later when friends crash your hammock vibe.
Maintenance mindset: keeping it deck-worthy
IMO maintenance is the price of great outdoor living.
- Clean regularly with a gentle soap solution to keep dirt from creeping into your boards.
- Inspect yearly for loose screws, wobbly rails, or any signs of rot. Catch issues early before they turn into wow-that-will-cost-a-fortune fixes.
- Seal or reseal, if you’ve got wood. Composite or PVC? You’re chilling—no need for staining, just a rinse.
Common pitfalls and how to avoid them
We’ve seen the mistakes, you don’t have to repeat them.
- Skipping permits or code checks. Yes, it’s boring, but it saves you legal headaches and insurance drama.
- Not accounting for drainage. Water + wood rot = not a good combo. Ensure a slope away from the pool and deck.
- Underestimating weight capacity. Guests, grills, and kid-filled chaos add up. Build with a margin for safety.
When to call in pros
– If your yard requires complex grading, you’re dealing with tricky soil, or you’re unsure about structural load calculations, a pro can save you from costly missteps.
– If your local code requires specialized flashing around a pool edge, don’t DIY that part unless you know what you’re doing.
FAQ
How long does a deck around an above-ground pool typically take?
Most DIYers can finish in a weekend to a couple of weeks, depending on yard access and complexity. If you’re hiring pros, plan a few days to a week, plus any permit approvals. FYI, extra time for staining or sealing is common.
What are the best materials for moisture-prone pool areas?
Composite or PVC decking handles moisture well and resists rot. If you go with wood, pressure-treated lumber with a good seal is an option, but expect more maintenance over time.
Do I need a railing around an above-ground pool deck?
Most local codes require some form of railing if your deck is tall or connected to a pool. Even if not required, rails add safety and can elevate the look. Self-closing gates are a nice extra touch.
Can I build a wrap-around deck on a sloped yard?
Yes, but you’ll need careful planning for steps, posts, and leveling. A stepped or tiered design can look fantastic, just be sure your grade is stable and well-drained.
What maintenance schedule keeps it looking fresh?
Do a quick clean every couple of weeks during the summer, yearly inspections for fasteners and rails, and seal or reseal every 2–5 years for wood. If you’re using composite or PVC, you’ll still want a periodic wash to remove grime and mildew.
Conclusion
You’re building more than a deck—you’re creating a hangout that makes your pool feel like a resort. With solid planning, careful framing, and attention to safety, your deck will stand up to summers, barbecues, and spontaneous dance-offs. Ready to grab the saw and start laying planks, or is it time to call in a pro for the heavy lifting? Either way, you’ve got this.